Jan 9, 2011
Making PCB with Roland Modela MDX-20 (Eagle version)
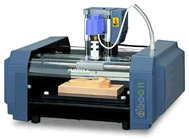
This post describes how to create PCB with Roland Modela MDX-20 mill machine. The above video shows a mill machine creating a PCB.

Software
- Eagle layout editor light edition
- Command prompt (Windows)
- Text editor
- Windows USB driver for Roland Modela MDX-20 (Installation image should comes with the machine)
- Arduino Software
- USB driver for Arduino (this should be in the Arduino software package)
Hardware
- Roland Modela MDX-15 or 20
- DATRON Fish tail End Mills for PCB Milling (Art. No. 0068106. 0.6mm flute diameter. 3mm shank diameter and Art. No. 0068110 for 1.0mm flute diameter)
- PS3 spindle from Roland (3mm shank diameter)
- Single sided copper PCB board (160x100mm is enough): You can buy them at Partco Oy in Helsinki.
- Arduino Duemilanove (or equivalent Arduino)
- USB A-B cable (to connect the Arduino with PC)
- Electronic components (LED, resistors and photo registor)
- Addition to them, tools to solder components.
All files used in this instruction
Eagle layout editor from CadSoft


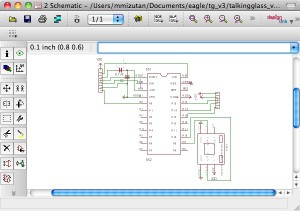
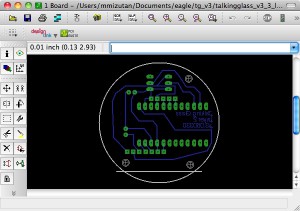
Eagle layout editor allows you to design PCB. The image on left hand side shows an example of schematic window. PCB layout is shown on the right hand side. There are various video tutorials on the web.
Make new project files in Eagle
- Create a project (File > New > Project) in the Control Panel window.
- Copy following Eagle libraries to the current project folder. The project should be created under “Document/Eagle” if its Mac.
- SparkFun.lbr (Sparkfun product catalogue is also in the zip file)
- MlabPaja.lbr
- Make all libraies disable under “example” folder in Control Panel window. Right-click on the example folder and select “Use none”. Otherwise it takes a lot of time to load them everytime you need to browse the libraries.
- Make the downloaded libraries enabled instead. Open the current project folder and right-click on the both library and select “Use”
- Create new schematic. (File > New > Schematic)
- Save the schematic in the project folder.
Tips:
Basic electronic components can be referred in the SparkFun library. If you use special sensors and actuators, you can create custom components. You can create them in a library window. (File > New > Library from Control panel window). There are various video tutorials.
Place components in the Schemtic window
You can see an example schematic in schematic.pdf.
- Select “Add a part” at the left and open ADD window. Select The window should show only three libraries.
- Open “SparkFun” library.
- Select the “LED” which has nested items and click the triangle to shows the items.
- Select “LED3MM” and press OK.
- Click in the schematic window will deploy the LED component. Right-click will rotate the component.
- Repeat the same procedure to deploy the following components.
- SparkFun > RESISTOR > RESISTORPTH-1/2W x 2 units
- SparkFun > PHOTOCELLPTH
- MlabPaja > ARDUINODUEMILANOVE
- Select “Info” tool and click register and enter value. One has 220 and another does 10K.
Tips:
- Scroll key on mouse will zoom in/out the window.
- Right-click over components and airwires will suggest applicable commands.
Connect airwires between the components
You can add lines to connect pins from the components. The example schematic is in schematic.pdf.
- Use “Move” tool to move components. Schematic does not affect the actual PCB layout. It is a plan how components are “connected” each other. You can organize the plan as you can read it easily. Right-Click while moving will rotate the component.
- Select “Wire” tool and draw lines from one component to another component. Clicking creates a corner while you are drawing. Pressing “ESC” will terminate the line. CMD+Z will allow you to undo by segment.
- Use “Move” tool to organize the components and airwires. Use “Delete” to delete components and airwires.
- Use “Junction” when you need to branch airwires. Otherwise Eagle doesn’t think the two crossing wires are connected.
Tips:
- Note that analog pin 0 is described as “A0” on the Arduino component. Digital pins has “D” as the prefix.
- When you want to select component, select the origin of the component. It is indicated by plus symbol.
Define wires connected to GND
GND need to have a special care. All airwires connected to GND should be declared. By doing this, you create a ground plane on your PCB layout to reduce noise and stabilize the electric circuit.
- Use “Name” and select the airwires which are connected to GND pins. Type “GND” in the Name window.
- If the application asks if you want to connected to other GND. Press yes. All GND wires should meet at the ground plane.
Convert from the schematic to the board window
The board window shows how your PCB will look like.
- Please double-check your schematic.
- In schematic window, select “Board” icon at the top. This will generate a board window where all components are linked to the schematic windows.
- Light edition does not allow to place components outside of the default board size (dimension). Thus you need to move all components inside of it.
- Layout the components using the move tool. Please avoid that multiple wires cross each other as much as possible.
Tips:
- You can also move the dimension (the outline of the board) if its smaller than the default size.
Load DRC (Design Rule Check)
- When you opened board window, you need to define DRC. (Tool > DRC in the board window) The DRC defines rules how to layout the PCB. For instance, the DRC defines the gap between routed wires.
- You can load mlabpaja.dru from the window.
The file mainly defines following rules.
- Clearance between objects. It should be more then diameter of end mill of the mill machine. e.g. 0.6mm.
- Minimum drill (end mill) size. e.g. 0.6mm.
- Restring (the metal part around the holes). Top is used only if you have surface mount components. Inner is used only if you have multiple layers of PCB. In the most of the case, you need only parameters under the bottom section.
- Shape. I recommend to have square in order to contour PCB faster.
When you press check, the board window is updated according to the DRC. If DRC Errors window pops up, you need to fix errors by moving component and rerouting tracks. By clicking each error, an arrow shows which part is needed to be fixed.
Routing tracks
- Change the information of wires that connected to GND. Select Info tool and click the wire and type GND in the Name field.
- Select Auto tool. This popup a Autorouter setup window.
- Change Top of prefferred directions to N/A. Keep Bottom as it is, thus the application only routes only on one side.
Tips:
- To remove all routed tracks and back to airwires, type “ripup;” (don’t forget semicolon!) in text field at the top.
- You can remove each routed tracks with ripup tool. Route tool can re-route tracks from the airwires.
Creating a tool path
You need to create a path which the end mill goes along with. You can loadYou can load it by File > Run and choose the file.
- Load fablab-mill-n-drill.ulp file. (File > Run) It is written in Eagle User Language Program (ULP).
- A window pops up asking some settings. Please fill as follow.
- Layer to mill (1 or 16) : 16
- Tool diameter (0.1 – 1mm): 0.6
- Signal in copper plane: GND (GND is connected the rest of copper plane)
- Mill larger holes to their size: Do not check!
- Pressing OK generates a tool path to contour PCB in layer 46. Drill holes will be in layer 45.
eta = 0.0001, --> eta = 0.000003125,
* Increased internal resolution:– The internal resolution of EAGLE has been increased by a factor of 32.It used to be 0.1 micron and is now 0.003125 micron. This allows drawingsin imperial units to use exact values for multiples of 1/4, 1/8, 1/16,1/32 and 1/64 mil.– The maximum drawing area is now 4×4 meters (about 150×150 inch).– If a User Language Program directly handles coordinates or sizes ineditor units and needs to know the actual value of one editor unit, itneeds to be adjusted to use the new value.– The new User Language functions inch2u(), mic2u(), mil2u() and mm2u()can be used to convert the respective units to internal editor units.– Due to the increased resolution of coordinates, any approved ERC or DRCerrors from older versions can no longer be recognized as such. Therefore,when you run the ERC/DRC after updating a file to version 6, these errorswill show up again and you may have to approve them again– Once you overwrite a project file (eagle.epf) from an older version withthis new version of EAGLE, the dimension values in it will be stored ina different format. If you then load such a file with an old version ofEAGLE, all menu entries (like wire widths or drill diameters) will fallback to their default values.
Replacing eagle.def file
Eagle doesn’t export the data that is readable for the Modela MDX-20 by default. Therefore you need to update Eagle’s CAM (Computer-aided manufacturing) processer.
- Quit the application.
- Replace eagle.def file in bin folder of the Eagle application.
- Launch the application again.
CAM processor to generate RML-2 file
CAM processor can now export data which is readable for the mill machine.
- Open the CAM processor window by selecting CAM processor icon next to printer icon at the top.
- If you have successfully replaced with the eagle.def file, you can see the following machine names in the device pulldown menu.
- Fablab Drilling
- Fablab Milling
- Load fablab-mill-n-drill.cam file from the CAM processor window. (File > Open > Job)
- The CAM processor window shows three tabs as you need to send three different data to the machine; milling data, drilling data and milling data to shape the board.
- Change only offset parameters, which means offset from the origin of x and y axis. The origin is at the bottom left corner at the work plate on the machine. There is a hole to indicate the origin. The layout is mirrored horizontally when you print the PCB. This means what you see on the right hand side in the Eagle layout will flip to the left. Therefore you need to add the width of your layout on the x offset. Please check the offsets on both tabs if they shows the same offsets.


- Press “Process Job” will generate data for contouring (.mill), data for drilling (.drill) and data for shaping the PCB board (.dimension) in the same directory as your board (.brd) file. These files are in RML-2 language format.
Tips:
All lines and shapes drawn in layer 45 is converted to “.drill” RML file. All lines and shapes in layer 46 will be in “.mill RML file. “.dimension” RML file will gathered from layer 20. If your printed board is different from what you thought, you can check those layers first.
Understanding RML-2 for your information
RML-2 file is the data that will be sent to Roland Modela MDX-20. It is just a simple ASCII text file.
Example RML program:
PA;PA;!PZ0,400;VS1;!VZ10;!MC0;PU3800,50;!MC0;
Basic commands used in this case. All commands are described in RML1_Command_GuideENVer100.pdf
- PA : PA without parameters effects a change to the absolute coordinate mode.
- !PZ : Set Z1 & Z2 command. This sets the Z1 and Z2 points. Z1 should be negative Z-axis operating range to 0. Z2 should be positive Z-axis. Unit is mill (1mil = 0.0254mm).
- VS : velocity select. Tool-speed setting command. The speed is set to the value of the parameter. VS0.5 may be 0.5 mili-inch/sec.
- !VZ : Velocity select Z axis. The speed is set to the value of the parameter.Unit is mill.
- !MC : Motor Control. When parameter is 0, rotation is stopped immediately. When parameter is 1, rotation starts.
- PU/PD : Pen up/down. Tool-up/down command. PU or PD without parameters performs only a tool-up or tool-down operation. Pen down command put the tool down to the z asix that is defined in the first parameter (a negative number) of !PZ. Pen up move it to the second parameter (a positive number). When parameters are present, the command performs the tool-up or tool-down operation, then operates to the coordinate value specified by the parameters. Unit is mill (1mil = 0.0254mm).
Modify RML data for drill and dimention
As the machine drill the same hole in several times, we need to modify the file ended with “.drill” and “.dimention“. The current files command to drill the hole in one time.
- Open the drill file in a simple text editor.
- Copy all the lines.
- Paste three times so that you have the same bulk of codes three times.
- Find the line “PA;PA;VS2;!VZ2;!MC1;!PZ-20,100;“. It appears three times in the same file.
- Keep the first one as it is.
- Modify the second one to “PA;PA;VS2;!VZ2;!MC1;!PZ-35,100;”
- Modify the third one to “PA;PA;VS2;!VZ2;!MC1;!PZ-70,100;”
- Save and close the file.
- Do the same procedure to the dimension file.
PA;PA;VS1;!VZ2;!MC1;!PZ-20,100;
PU263,50;
PD263,2150;
PD329,365;PU0,0;!MC0;
The above code will be this as follows.
PA;PA;VS1;!VZ2;!MC1;!PZ-20,100;
PU263,50;
PD263,2150;
PD329,365;PU0,0;!MC0;
PA;PA;VS1;!VZ2;!MC1;!PZ-35,100;
PU263,50;
PD263,2150;
PD329,365;PU0,0;!MC0;
PA;PA;VS1;!VZ2;!MC1;!PZ-70,100;
PU263,50;
PD263,2150;
PD329,365;PU0,0;!MC0;
Install a end mill

You need to install the appropreate end mill. The user matual is MDX-20-15_USE_ENGLISH_R5.pdf. and read the instructions from page 26. Use the PS-3 spindle which has 3mm shank diameter.
End mills
- 0.6mm flute diameter with 3mm shank diameter for milling
- 1.0mm flute diameter with 3mm shank diam for drilling and milling the outline of the board.
Please use the end mill that is designed for printed circuit boards. Otherwise it will destroy the mill. We use DATRON Micro-Toothed End Mills (Art. No. 00686506 for 0.6mm and 0068110 for 1.0mm).
Place a copper board on the work plate
There is a hole the left bottom corner on the work plate. This hole indicates the orizin of x and y positions. Fix another copper board (used one is fine) under the copper board to avoid from drilling the work plate itself. You can use double side tape to fix it on the plate.
Set depth-direction reference point
You need to set the depth-direction (z axis) reference point. This means that the 0 point of z axis. Position under the point will be negative and above the point will be positive.
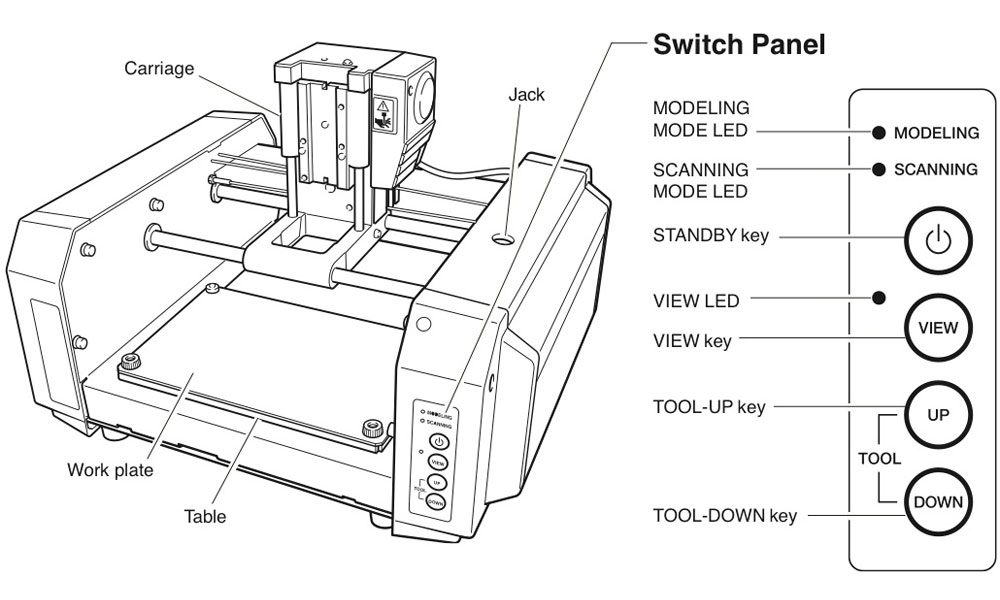
- Press STANDBY key to switch on the machine.
- If VIEW LED is on, press VIEW key. This operation should move the end mill to the origin of x and y axis. If not, you might have on going job. The way to cancel the job is described in the next paragraph.
- If the end mill start moving in different directions, the machine has on going data. Don’t panic. Just press VIEW key again to stop the operation. It will move to the default position at the right hand side. To cancel the operaton completely, please look at “How to cancel on going operations”.
- VIEW LED should be flashing.
- Press TOOL-UP/DOWN key to set the depth-direction reference point (for !PZ command in the RML file) . Long press will move the mill continuously. A short press will move the mill by 1mil. You can also unscrew the milling bit to place it on the copper board.
Move the end mill using RML file to test the machine
In this section, you can only move the end mill to desired position. It doen’t mill at all thus it is good for you to test the machine. You need to use Windows to complete this operation as I couldn’t find any other suitable USB driver for other platforms. You will send the data using Command prompt application. This means that the data is sent through serial communication.
- Open move.rml in a text editor.
- It should show “PA;PA;!PZ0,1000;VS10;!VZ10;!MC0;PU3800,50;!MC0;”. First number following the command is horizontal position. The second number is vertical position.
- Change two parameter following the PU command. The first parameter defines X (horizontal) position. The second one does Y (vertial) position. The unit is mill (1016mill = 1 inch. Mill is not millimeter.).
- Save the file.
- Open Command prompt application.
- Move to the directory where the saved file is located. Use “cd” to browse directories. e.g. cd Desktop(and return). “dir” command will show the files and directories under the same path. Pressing tab will give you suggestion of files and directories. “cd ..” will move one folder above in hierarchy.
- Type “type move.rml > com3 (you need to know which com port is used for the machine. In our case, it is COM3.)
- Pressing return immediately move the end mill.
- Change the two parameters in the file and save. The first parameter defines x position and the second one does y position.
- Save it.
- Type “type <filename> > com3
- Pressing return immediately move the end mill.
Send the data to the machine to mill and drill
Finally you can print PCB. Please follow the order of data you send with appropreate end mill (0.6 or 1.0 mm). If you use a wrong end mill, the machine might destroy the end mill.
- <project name>. mill with 0.6 mm end mill
- <project name>. drill with 1.0 mm end mill
- <project name>.demension with 1.0 end mill
Here is how to send the data to the machine.
- Open the Command prompt application.
- Go to directory where the data file is by using “dir” and “cd” command. See the previous section to see detailed instruction.
- Type “type <filename> > com3 (you need to know which com port is used for the machine).
- The machine will start milling when you press return.
Tips:
Be ready to press VIEW key anytime in the beginning of operation to avoid further damage in case. Pressing VIEW key always pause the operation immediately. Please note it won’t cancel the operation. This means that it will resume when you press the VIEW button again.
How to cancel on-going operations
- Press View key first if the green LED next to the button is not off.
- Press TOOL-UP and TOOL-DOWN keys at the same time.
- The VIEW key will flash while deleting.
- The flash stops when The deletion is finished.
- Please also check Roland MODELA MDX-20 printer window to check if there is not pending jobs. You can access it from Start > Printers and Faxes.
- After the deletion is completed, you can send a new file.
After the work is done
Please hoover the dust from the work plate and turn off the machine.
Soldering
Media Lab Paja room has enough basic tools for you to solder the components. See this video tutorial as an example.
Tips
- Solder small components first and move to bigger components.
- Do not forget some of components has polarity. e.g. LED
- In the case of IC, solder only one pin at the corner and fix the IC in the right place. After the IC is in the right position, you can solder the rest of pins.
- When you need to remove components, watch this tutorial first.
- Don’t solder Arduino!
Uploading Arduino code
Upload arduino.pde using Arduino Software. The circuit detects ambient light and change the speed of flashing LED.

What an exciting addition to our Paja!
Yes. I was also excited when I received the machine. There are still a bit of work to do before the machine is running. Stay tuned.
[…] See the other post for details. […]
hi,
is this working yet? would love to try it out.
Yes. It’s working. I am planning to have a demo session to show it soon.
Units are actually not in millimeters. 1 inch = 1016 units
Thanks Michi for the very clear and good instructions. I printed my first pcb yesterday!
Went pretty smoothly thanks to this blog 🙂
one question : if I have 3 copies of the same (small) circuit that are laid out on the same board, is it possible to define the borders for the three different circuits so the CNC machine can cut each one ?
or do I have to cut them manually later?
I couldn’t find much info on this online, would appreciate if anyone here could help.
thanks!
Hi John,
I didn’t know the additional 16 units in 1 inch.
1 inch = 1016 units = 1016 mills.
Ramyah,
Did you manage to do it with our machine by yourself? Great!
You can save space in a PCB board by printing multiples. In that case, change X offset in the CAM processor window.
ah, ok il try offsetting next time.
Thanks.
yes, I could quite easily use the machine with these instructions. The difficult part was the circuit design actually, the rest was quite straight forward.:)
I will also demonstrate the machine on next Thursday at 14. We can discuss details then.
where can i buy these copper boards used for printing?
-thanks
Usually local electronic shop has one. In Helsinki, I buy them from Partco.
http://www.partco.biz/verkkokauppa/product_info.php?cPath=1174_1904&products_id=11619
What I was drilling Roland does not work do not require Software
We are urgently looking for below :
PCB (New or Used) for, ROLAND R-700 (1995)
-B 37 1063 70 : Power supplyer-A 351, solt 10 (-1-)
-B 37 1079 70 : Control board for steppy moter A-351 slot 9 (-5-)
-A 37V 1064 70 : Processor for process Rock-A351 slot 2 (-2-)
-O 37 u 3924 99: Controller for M/C fomtch roller (-1-)
-A 37V 1080 70 : Conter board for positiong Moter A-351, solt5 (-2-)
Your kind advice will be appreciated.
where can i found the milling tool????
DATRON Fish tail End Mills for PCB Milling (Art. No. 0068106. 0.6mm flute diameter. 3mm shank diameter and Art. No. 0068110 for 1.0mm flute diameter)
can you but a link to it plzzzzzzzzzzzzzzzzz
Hi, this might be a stupid question but where do i find the fablab-mill-n-drill.ulpv file. Thanks.