1. Introduction
1.1 What is AR?

“Augmented reality (AR) is a live, direct or indirect, view of a physical, real-world environment whose elements are augmented by computer-generated sensory input such as sound, video, graphics or GPS data. It is related to a more general concept called mediated reality, in which a view of reality is modified (possibly even diminished rather than augmented) by a computer. As a result, the technology functions by enhancing one’s current perception of reality. By contrast, virtual reality replaces the real world with a simulated one.”
From http://en.wikipedia.org/wiki/Augmented_reality
1.2 What is FLARToolKit?
“FLARToolKit is an ActionScript port of NyARToolKit, a Java/C#/Android port of ARToolKit, the well known AR tracking library developed by Dr. Hirokazu Kato. ARToolKit is the most popular marker based AR tracking library and has been ported to many different operating systems and programming languages. FLARToolKit was mainly developed by Tomohiko Koyama (aka Saqoosha), and has been used in many high profile web-based AR applications. FLARToolKit is provided under a dual license model (GPL and commercial).”
From http://www.artoolworks.com/support/library/FLARToolKit
The main FLARToolKit download page can be found here:
http://www.libspark.org/wiki/saqoosha/FLARToolKit/en
Many other useful links (Forums, tutorials, examples) can be found also here:
http://www.artoolworks.com/support/library/FLARToolKit
1.3 Flash, Papervision 3D, COLLADA/DAE and Blender
Although we won’t have time to go deeply into each of these tools and resources, here are some useful links regarding Flash, Papervision 3D and DAE:
More about Flash:
http://www.adobe.com/products/flash.html
Papervision 3D is a library for using 3D in Flash. FLARToolkit uses Papervision 3D as its 3D engine.
More info:
http://blog.papervision3d.org/
Papervision 3D (and thus FLARToolkit) uses COLLADA to import 3D models from 3D applications.
From http://en.wikipedia.org/wiki/COLLADA:
“COLLADA is a COLLAborative Design Activity for establishing an interchange file format for interactive 3D applications. COLLADA documents that describe digital assets are XML files, usually identified with a .dae (digital asset exchange) filename extension.”
More info:
https://collada.org/
Blender is a useful 3D software, because it is free / open source and quite powerful – not only for creating models, but also for converting to DAE (using File > Export > COLLADA):
http://www.blender.org/
Many free Blender models can be found online. Search for “Blender Models”, for example: http://www.blender-models.com/
1.4 About markers
ARToolkit relies on markers. We will use single marker detection in our examples.
Markers have 2 components: the printed marker (1), and its virtual counterpart (2), a “.pat” file which is used by ARToolkit to recognize the marker.
Regarding (1), I will quote Mikko Haapoja (image also from Mikko):
“Design a marker using the following specs. You can put whatever you want in the middle of the square although I think some shapes work better than others so experiment:”
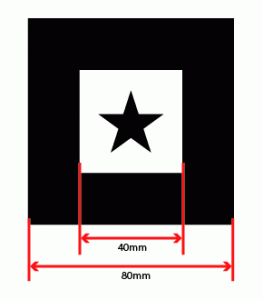
Via: http://www.mikkoh.com/blog/2008/12/flartoolkitflash-augmented-realitygetting-started/
Regarding (2), you can download a marker pattern generator from:
http://saqoosha.net/lab/FLARToolKit/MarkerGenerator/MakerGenerator.air
or use an online one:
http://flash.tarotaro.org/blog/2009/07/12/mgo2/
Still regarding marker design, please take into account the following:
“Each FLARToolkit application can have its own mark of detection, but you must remember that the intersection of bitmaps should be facilitated. The mark needs to present itself very different to each rotation of 90°, so the FLARToolkit knows the correct way to render the Papervision3D.” (from: http://www.cabanacriacao.com/tutorialW/Tutorial_FLARToolkit_english.pdf)
2. Development
2.1 Using FLARToolkit with a static image:
I have adapted the “Simple Video” example by Very Nice Industries, and replaced the video with a static image (with a few adaptations):
http://mlab.taik.fi/mediacode/coursefiles/course_2012_ID/simple_image.zip
This example is based on another one, by Mikko Haapoja:
http://www.mikkoh.com/blog/2008/12/flartoolkitflash-augmented-realitygetting-started/
Changes you might want to make in the code:
Any change made in the code requires adding any files (images, patterns) to the src > resources folder, opening “SimpleImage.fla” and “SimpleImage.as” in Flash, and selecting Control > Test Movie > Test.
After that, a .swf file is generated, which can be opened autonomously or embedded in an HTML file.
Within the .as (ActionScript, Flash’s programming language) file:
1. change the pattern
– replace the .pat file name in line 30
2. change the image
– replace the image file name in line 87 (jpg and png work, png allows for transparency)
3. change the positioning
– change the x,y,z values in lines 113, 114, 115
Please note that the coordinates in FLARToolikit work this way:
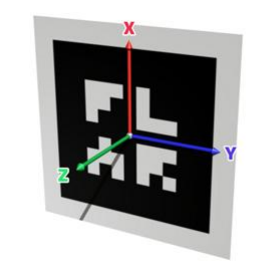
(image via http://www.cabanacriacao.com/tutorialW/Tutorial_FLARToolkit_english.pdf)
Screenshots (in the first one, the marker is not yet fully captured by camera, in the second it is):
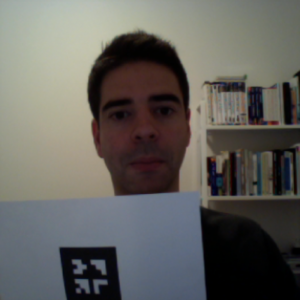 Â
 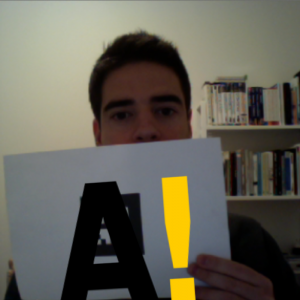
Thanks to Very Nice Industries for the original example:
http://veryniceindustries.com/content/using-flartoolkit-papervision3d-and-video
2.2 Using FLARToolkit with a video:
Download the original Very Nice Industries example:
http://veryniceindustries.com/content/using-flartoolkit-papervision3d-and-video
[updated 18/4/2013] above link seems to be broken, so I’ve re-uploaded the video example here:
http://mlab.taik.fi/mediacode/coursefiles/course_2012_ID/simple_video.zip
Use a FLV video in order to benefit from the code optimization, and also from the transparency allowed by the format.
Changes you might want to make in the code:
1. change the pattern
– replace the .pat file name in line 29
2. change the video
– replace the image file name in line 72
3. change the positioning
– change the x,y,z values in lines 100, 101, 102
4. Delete the 3D logo
– delete line 106
2.3 Using FLARToolkit with a DAE 3D model:
I found that this example is easy to use in terms of changing the DAE 3D model:
http://www.cabanacriacao.com/blog/archives/tutorial-realidade-aumentada-flartoolki/
(scroll down for english version)
Changes you might want to make in the code:
1. change the pattern
– replace the .pat file name in line 128
2. change the DAE
– replace the image file name in line 156
3. change the scaling of the DAE
– change the value in line 291
4. change the positioning
– change the y value in line 294
– for x and z, copy-paste, change y into x and or z, and add your own values
5. delete the sound
– delete line 390
Notes [added 1/2/2012]:
1. Patterns are in the Data folder, DAE files in the DAE folder.
2. To use this example, you will have to relink the libraries, as explained in the beginning of the tutorial linked above.
2.4 Tracking multiple markers [added 1/2/2012]:
I’ve created one more example, based on a tutorial by Rob Hawkes:
http://rawkes.com/blog/2010/01/26/tracking-multiple-augmented-reality-markers-flarmanager-and-papervision
While in the original version each of 6 markers generates a differently colored cube, in my version it displays a different image. You can download my example from here:
http://mlab.taik.fi/mediacode/coursefiles/course_2012_ID/multiple_markers_images.zip
The example tracks 6 different markers and places images. Image file names can be replaced in lines 115 to 120. Patterns and images go into the root folder.
[updated 18/4/2013] A variation of this, triggering a sound when the first marker is recognised: http://mlab.taik.fi/mediacode/coursefiles/course_2013_IVD/Multiple_Markers_Images_sound.zip
3. Further explorations
Of course, this is just the start. You can check out the links in here for further explorations:
http://www.artoolworks.com/support/library/FLARToolKit
Also, if you use Processing:
http://www.creativeapplications.net/processing/augmented-reality-with-processing-tutorial-processing/
openFrameworks:
http://ofxaddons.com/repos/44
openFrameworks and iOS:
http://forum.openframeworks.cc/index.php?topic=7103.0
iOS or Android:
http://mlab.taik.fi/mediacode/archives/1485
Unity:
http://www.artoolworks.com/support/library/ARToolKit_for_Unity
More inspiration material [added 1/2/2012]:
Artvertiser: http://selectparks.net/~julian/theartvertiser/
Art and AR at the Creators Project, by James Alliban:Â http://thecreatorsproject.com/blog/guest-column-james-alliban-on-augmenting-the-future-of-art
AR projects by James Alliban: http://jamesalliban.wordpress.com/category/augmented-reality/

Pingback: FLAR Again… | neasa ronayne