Jan 10, 2011
Intensive workshop in Designing Interactions course 2011 Spring at Media Lab Helsinki
Intensive workshop in Designing interactions course
Date: February 7 – 11, 2011
Location: Media lab Helsinki in Helsinki, Finland
Introduction to electronics: PDF
Setting up Arduino environment:
- Download Arduino Software from Arduino Download page
- Install USB driver. The install image is in the downloaded Arduino folder
- Select following setting when you run Arduino software first time.
- Tools > Board > Arduino Duemilanove or Nano w/ ATmega328
- Mac: Serial Port > /dev/cu.usbserial-xxxxxxxx
- Install 3rd party libraries (How to install libraries)
- Run example code
- File > Examples > Digital > BlinkWithoutDelay
- File > Up load to I/O Board
- LED by digital pin 13 will start blinking. If not, you will received some error in red text.
Tools:
- Arduino board
- USB Type A-B
- Breadboard
- Jumper wires
- Multimeter
Basics
- Exercise: Hello world – Arduino code
- Exercise: Flashing LED – Arduino code
- Exercise: Sending data to your PC (Serial.print, println) – Arduino code
- Exercise: Understanding ASCII (American Standard Code for Information Interchange) – Arduino code
- Demo: Type of Numbers (Binary, Hexadecimal, Decimal, Signed Decimal) – Arduino code
Architecture
- Demo: Variables type definitions – Arduino code
- Exercise: Arrays/Strings – Arduino code
- Exercise: Operators (+, -, *, /, %) – Arduino code
Controls
- Exercise: Functions – Arduino code
- Exercise: Looping structure (For statement) – Arduino code
- Exercise: Branching (If statement) – Arduino code
- Demo: Branching (Switch statement) – Arduino code
- Exercise: Data controls (ramdom) – Arduino code
IO Commands:
- Digital IO (digitalWrite)
- Exercise: Flashing LED – Schematic, Arduino code
- Digital IO (digitalRead)
- Exercise: Tilt switch – Schematic, Arduino code
- Digital IO (pulseIn)
- Exercise: Memsic 2125 Accelerometer: Measuring tilt and motion – Schematic, Arduino code
- Exercise: Ping))) Ultrasonic Sensor: Measuring distance – Schematic, Arduino code
- Analog IO (analogWrite using PWM pins)
- Exercise: Dimming LED – Schematic, Arduino code
- Analog IO (analogRead)
- Exercise: Photoresistor: Measuring ambient light – Schematic, Arduino code
- Exercise: Flexiforce Sensor Demo Kit: Measuring pressure – Schematic, Arduino code
- Exercise: Piezo speaker: Detecting vibrations – Schematic, Arduino code
- Extend capability using libraries (#include)
- Exercise: Servo motor –Schematic, Arduino code
- Excercise: Motor shield to control Stepper motor – Schematic, Arduino code
Communicating with PC over Bluetooth
- Messenger library is used in this exercise. It provides a simple protocol to send and receive values to PC over serial communication.
- BlueSMiRF Gold Bluetooth module – Instructions to configure the module
- Install Messenger library – Instructions
- Excercise: Controlling LEDs and measuring a tilt switch and proximity: Schematic, Arduino code
- Pair the BlueSMiRF Gold bluetooth module
- Pair the Bluetooth module with your Mac
- Select status bar
- Select “Bluetooth”
- Select “Devices” and select “New”
- The dialog should show the name started by “FireFly-****” (*shows last 4 digit of the physical address)
- Select the BlueSMiRF Gold
- Type “1234” in the Passcode
- Select “Pair”
- “FireFly-****” appears in the list when successful
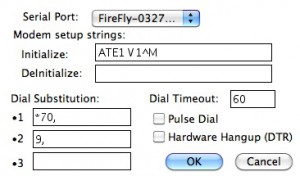
- Communicate to Arduino using Zterm (terminal emulation program for Mac)
- Open Zterm
- Settings > Modem preferences…
- Choose FireFly-****

- Edit > Keyboard Buffer
- Type “r a d 7” and press return in the keyboard buffer window. Local window will show value received from the proximity sensor.
- Type “w a 9 <number>”. <number> will have integer betwen 0 and 255. Pressing return will light up LED.
- Pair the Bluetooth module with your Mac
Communicating with desktop applications
- Processing: Processing code
- Pure Data: Puredata patch
- Flash: Serial server in Processing (written by Tom Igoe), Flash file
Other sensors and actuators
You can browse other sensors and actuators from various online shops. Especially the following online and local shops have components for Arduino.
Sparkfun (USA), Parallax (USA), Paeae (Finland), Robomaa (Finland) and Partco (Pohjois-Haaga, Helsinki)
There are also demos using the components available in Media Lab Helsinki.
http://mlab.taik.fi/paja/?cat=39
Wednesday
Printed circuit board (PCB)
See the other post for details.
Thursday
Individual work
Friday
Individual work and presentations
